
How to Make Picture Transparent in PowerPoint
Including picture transparency in PowerPoint will greatly enhance the look of your presentations. This post will show you Make Picture Transparent in PowerPoint 2007, 2010, 2016, 2019, 2021, or even the new 2024 edition effortlessly.
Why Making Pictures Transparent in PowerPoint Matters?
Knowing how to create picture transparency in PowerPoint not only creates a design hack but also a terrific tool for professional, aesthetically beautiful presentations.
Clear images allow you emphasize important phrases or data while maintaining a neat and current appearance, therefore helping you to stack stuff without crowding the display.
One of the major purposes of a transparent image as a background is to facilitate reading text without compromising the visual appeal.
Another important use is in stressing specific parts of an image by changing its opacity, therefore guiding the observer’s attention exactly as intended.
Transparency determines also custom watermarks, brand consistency, or simple designs keeping the audience targeted.
Improved transparency characteristics of PowerPoint let users quickly adjust picture opacity without consulting other editing tools.
How you make a photo translucent in PowerPoint greatly improves the professionalism, clarity, and beauty of your presentations whether you are creating marketing pitches, teaching tools, or business reports.
How to Make a Picture Transparent in PowerPoint 2007
In PowerPoint 2007, there’s no direct transparency option for pictures. Instead, follow these steps:
- Insert a Shape (e.g., Rectangle) into your slide.
- Right-click the shape and select Format Shape.
- Under Fill, choose Picture or Texture Fill and insert your image.
- Adjust the Transparency slider to your preferred level.
Although not direct, this method helps make a picture transparent in PowerPoint 2007 effectively.
How to Make a Picture Transparent in PowerPoint 2010
Similar to PowerPoint 2007, you must use the shape trick:
- Insert a shape.
- Format it by inserting your picture inside.
- Adjust the transparency slider.
Note: PowerPoint 2010 doesn’t support direct picture transparency unless it’s inside a shape.
How to Make Picture Background Transparent in PowerPoint 2016
PowerPoint 2016 introduced the “Remove Background” tool:
- Select the image.
- Click Picture Format > Remove Background.
- Adjust the selection to keep necessary parts.
- After background removal, you can apply transparency if needed.
Also, for overall transparency:
- Select the image.
- Go to Picture Format > Transparency.
How to Make Picture Transparent in PowerPoint 2019
In PowerPoint 2019, Microsoft finally introduced a direct transparency feature:
Select your image.
Go to Picture Format → Transparency.
Choose a preset or click Picture Transparency Options for fine adjustments. This was a major improvement, making it easier to create overlays, soft backgrounds, and layered effects.
How to Make Picture Transparent in PowerPoint 2021
PowerPoint 2021 improved the transparency options:
- Directly adjust transparency using Transparency presets.
- Click Picture Transparency Options for more control.
- Combine with “Remove Background” for polished designs.
How to Make Picture Transparent in PowerPoint 2024
PowerPoint 2024 has both basic and sophisticated choices for users, having enhanced and simplified the process of changing picture transparency.
Here’s how you make a photo translucent in PowerPoint 2024 whether you’re stressing a particular area of your image or designing a subdued backdrop effect:
Step-by-Step Guide:
Insert the Image:
Begin by opening your PowerPoint presentation and navigating to the Insert tab on the Ribbon.
Click on Pictures and choose your image either from your device or online sources.
Select the Image:
Once the image is inserted, click on it to activate the Picture Format tab in the Ribbon. This is where you will find all the image-related editing tools.
Use Transparency Presets:
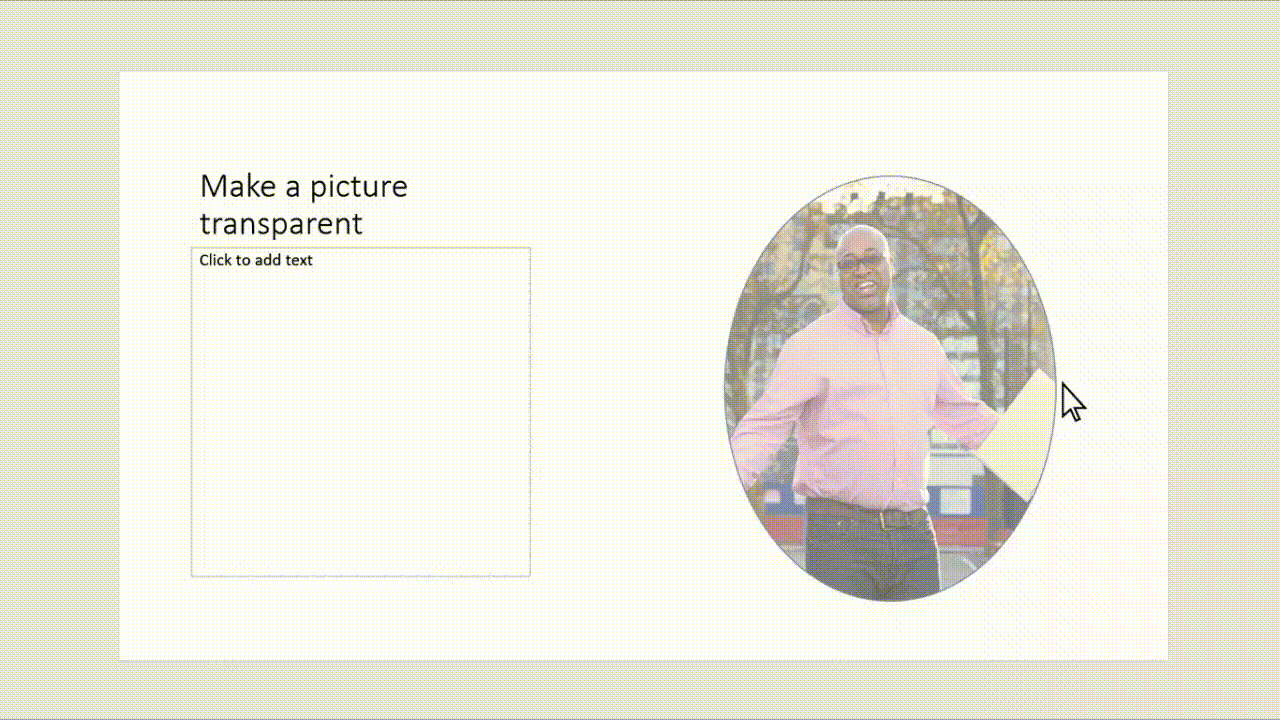
In the Picture Format tab, click on the Transparency button. This will open a drop-down menu with several preset transparency options, such as 15%, 30%, 50%, 65%, 80% and 95%.
Simply click on one of these options to apply the selected transparency to your image instantly. These presets are perfect for quick adjustments.
Custom Transparency Adjustment:
For more precise control over the transparency, click on the option labeled Picture Transparency Options at the bottom of the drop-down menu.
A panel will open on the right side of your screen where you can manually adjust the transparency using a slider or by typing a specific percentage (from 0% to 100%).
This gives you the ability to adjust how transparent or opaque you want your image to appear, allowing for much finer control than the preset options.
Advanced Background Removal:
One of the standout features in PowerPoint 2024 is the improved Remove Background tool, which leverages AI to automatically remove the background from images with greater accuracy than ever before.
To use this tool, select the image and click on Remove Background under the Picture Format tab.
Once the background is removed, you can still adjust the transparency of the remaining image to create a polished, professional look.
Partial Transparency for Specific Areas:
Another useful feature in PowerPoint 2024 is the ability to apply partial transparency to just a specific part of the image.
By using the Selection Pane along with the Format options, you can isolate areas of the image and make only certain sections partially transparent. This is particularly useful for creating layered effects or watermarks.
Tips for PowerPoint 2024 Image Transparency:
- Combine Transparency with Other Effects: To make even more dynamic and aesthetically pleasing presentations, use transparency with additional PowerPoint effects as shadows, reflections, or 3D effects.
- Preview on Different Devices: Always preview your presentation on many devices to guarantee that the transparency effect looks as intended, particularly on displays with differing resolutions.
- Save in PPTX Format: Always save your PowerPoint file in the PPTX format to maintain all transparency settings throughout several devices for optimum results.
How to Make a Picture Transparent in PowerPoint on iPad
If you’re using PowerPoint on an iPad:
- Direct transparency adjustment is not supported yet.
- Use third-party apps like Canva or Adobe Express to make your image transparent first.
- Save it as a PNG file.
- Insert the transparent image into PowerPoint on your iPad.
Picture Transparency PowerPoint Not Showing? (Common Problems)
Sometimes the transparency option might not appear because:
- You may have selected a non-picture object (like a shape).
- Your PowerPoint version might be outdated.
- Certain file formats (e.g., EMF, WMF) may not support transparency.
Solution: Always insert a standard image file (JPG or PNG) and ensure you’re on the Picture Format tab.
Make Image Transparent Online (Best Tools)
Prefer editing before inserting? Use these popular online tools:
- Remove.bg – Best for automatic background removal.
- Canva – Create fully transparent images (Pro users).
- LunaPic – Free online editor with transparency settings.
- Pixelcut – Background removal and transparency editing.
Tip: Save your transparent images as PNG files to maintain quality.
FAQs About Making Pictures Transparent in PowerPoint
How do I make a picture background transparent in PowerPoint?
Use the Remove Background feature under the Picture Format tab, available from PowerPoint 2016 on wards.
Why can’t I adjust picture transparency in PowerPoint?
It might be because you’re using an old version, or you haven’t selected the image properly. Ensure you’re under the Picture Format tab.
Can I make a picture semi-transparent in PowerPoint?
Yes! From PowerPoint 2016 on wards, you can manually set the transparency percentage using the Transparency slider.
Is it possible to make part of an image transparent in PowerPoint?
Yes, using the Remove Background tool combined with partial transparency settings.
How to make a picture transparent without using PowerPoint?
You can use free online tools like Remove.bg, LunaPic, Canva, or Adobe Express to create a transparent version of your image.
Conclusion
Knowing how to make picture translucent in PowerPoint can help you produce slides that seem more professionally neat.
Whether your presentation calls for PowerPoint 2007, 2010, 2016, 2019, 2021, or 2024, the correct approach can greatly improve your designs.
If you work on an iPad or have problems with built-in choices, internet tools provide great substitutes.
These days, you may quickly create semi-transparent objects from your photographs and elevate your presentations!


